- First start of the virtual machine
- Creating and using SSH keys
- Deployment of Seadrive
- Desktop
- User interface settings
- Advanced use
The operating system of the virtual machine is Debian Linux 10 and the interface is the Xfce desktop. The interface follows the traditional Windows 95-era desktop model, which splits the view into a desktop with a wallpaper below and shortcuts on top, and a taskbar at the bottom of the screen with a Programs menu on the left.

By default, the taskbar has a list of running programs in the middle, background service icons in the notification area, and programs installed on the system in the Programs menu. Pressing the Programs menu opens a menu that lists all installed graphical user interface programs by category. The desktop also has an Eclipse icon and links to a few folders.
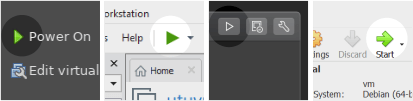
First start of the virtual machine
To start the virtual machine, click the green arrow button at the top of the hypervisor window:
First boot user configuration issues
The first time you start a virtual machine, the system displays a series of dialogs to adjust user settings before opening the desktop. Let us now briefly consider the significance of these.
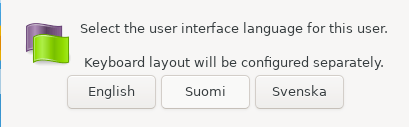
- First, the system asks for a language selection:
- Then the keyboard layout:
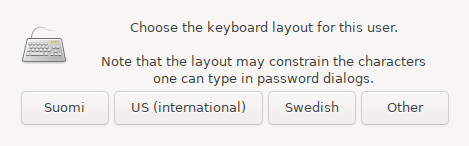
Shortcut options are Finnish, Swedish and us-international (us-key, which you can use altgr + q / w / p to get suffixes). The Other option allows you to adjust other layouts using the XFCE desktop's own configuration feature.
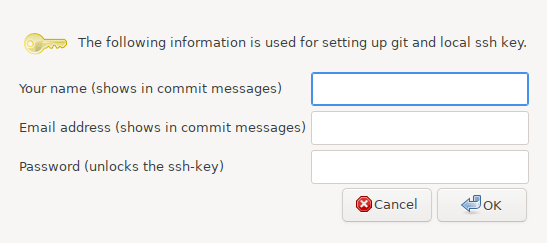
- Next, the information of the SSH key to be asked is needed when sending files to GitLab projects, for example.
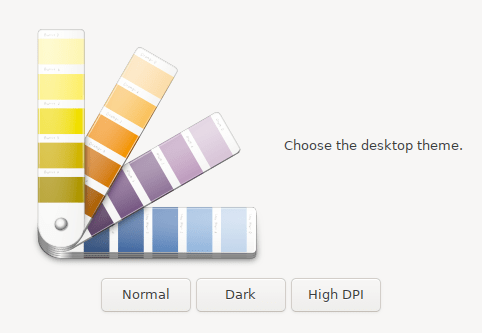
- The next color theme setting to be asked is in beta. "Normal" is the recommended setting.
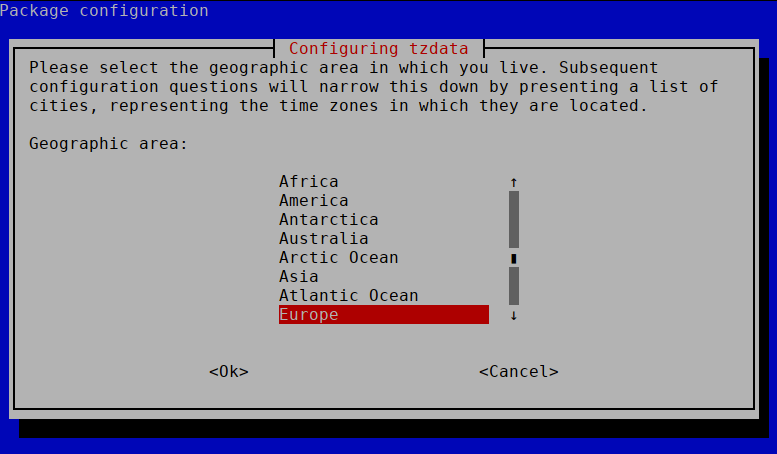
- The last time zone chosen is usually Europe / Helsinki:
You can change the settings later, but you should enter them correctly in the question boxes to avoid problem situations. For example, an SSH connection to Gitlab will not work if you do not remember the correct SSH key passphrase when connecting to Gitlab.
Creating and using SSH keys
The key is used for GitLab authentication, so no separate login is required. If you have automatically generated the key with the entries you entered during the login step, you can proceed directly to the next step.
Key generation
If you forgot your local ssh password, you can recreate the key on the command line:
$ configurator.sh sshkey
The command opens the same input box as the first boot user configuration:
Attaching a key to GitLab
-
To view the key, double-tap the key icon on the desktop or in the extension with the command cat ~ / .ssh / id_rsa.pub and copy it to the clipboard.
-
Paste your key in the field found on https://gitlab.utu.fi/profile/keys and press 'Add key'.
-
Your key should now appear in GitLab's 'Your SSH keys' list.

Deployment of Seadrive
If you have a University of Turku username, you can use the University's Seafile cloud storage space.
Two client programs are available from Seafile, Seafile, which synchronizes files locally, and Seadrive, which uses remote files directly. The latter is pre-installed on the virtual machine.
Deploying a disk on a virtual machine is easy. First, start the Seadrive application from the program menu. The address of the university's Seafile server is https://seafile.utu.fi. Enter your username and utu password as shown:

Seadrive creates a separate virtual disk drive in the virtual machine, where the stored files are automatically transferred to the cloud of the University of Turku, where they remain even if the virtual machine is destroyed. Seadrive also makes it easy to transfer files between a virtual machine and a physical machine.
Desktop
Shortcuts are installed on the desktop of the virtual machine. These include icons for the Recycle Bin, file system startup, home directory, and document folder. In addition, there are icons on the desktop to launch Eclipse and IDEA. The "My SSH public key" icon will display your own ssh key. In addition to these, depending on the version, the desktop has icons for launching programs used in courses.
User interface settings
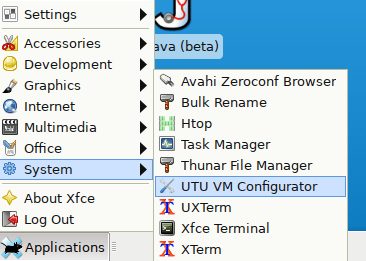
The UTU VM Configurator program has been made to adjust the settings of the virtual machine. The program is located as shown in the System menu:
When you open the configurator GUI, you will see a window as shown below:
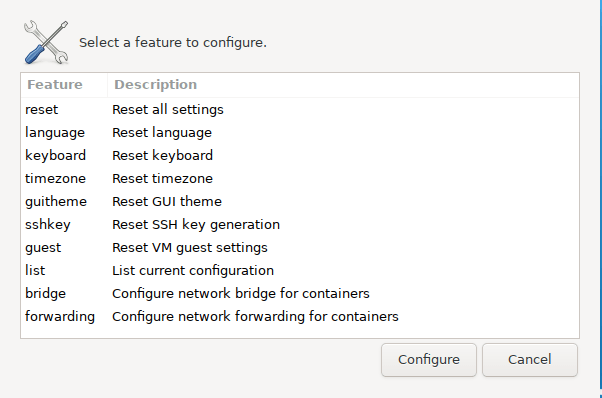
The window allows the following functions:
| ** Feature ** | ** Description ** |
|---|---|
| * reset * | Clear all of the following settings |
| * language * | Change the interface language. |
| * keyboard * | Change the keyboard settings (us-international is recommended if you have a uk / us keyboard). |
| * timezone * | Change the time zone. |
| * guitheme * | Change the desktop color theme. |
| * sshkey * | Make a new ssh key and delete the old one (if you forgot the key, for example). |
| * guest * | Reconfigure VM guest tools (for example, if you switch from VMware to Virtual Box). |
| * list * | Prints the current settings. |
| * bridge * | Described in [network configuration section] (network /) |
| * forwarding * | Described in [network configuration section] (network /) |
The first six functions are the same as the questions asked the first time you start the virtual machine.
The configurator can also be used in the terminal with the command configurator.sh. Type configurator.sh help for a list of available parameters. In practice, the commands are the same as in the graphical user interface. For example, configurator.sh keyboard .
Reset settings
Change the settings either by selecting "UTU VM Configurator" from the System menu of the Start menu and selecting "reset" from its menu or by using the command configurator.sh reset from the command line .
Advanced use
Administrator rights
The user of the virtual machine has sudo rights. Username and password are:
- id: utu
- password: ttlaitos
Package installation
Packet databases have been omitted from the virtual machine for space reasons. Before installing packages, update the package lists:
$ sudo apt update
$ sudo apt install cowsay
$ cowsay Moo!
 ______
< Moo! >
 ------
        \   ^__^
         \  (oo)\_______
            (__)\       )\/\
                ||----w |
                ||     ||
Next, you can read the course-specific instructions, e.g.