Level 1: Hardware and firmware
Virtualization is turned off
Many consumer computers are sold with virtualization turned off in the "UEFI BIOS" settings. In this case, the virtual machine will not start, but you will receive an error message similar to the following:
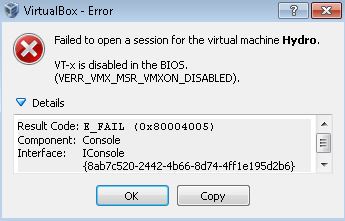
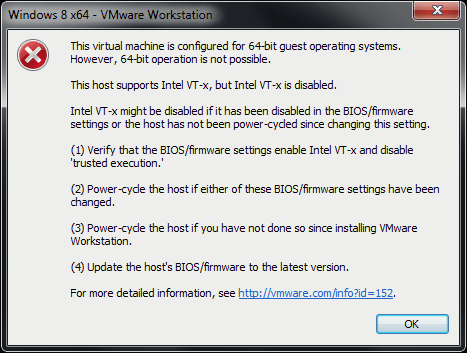
Turning on virtualization does not slow down your computer measurably or compromise security. Virtualization must be turned on to use virtual machines.
The virtualization setting is located in the computer's boot software (BIOS), which is usually accessed by pressing F1, F2, F9, F11, F12, or Del (or on some machines, such as Fn-F1, Fn-F2, etc.), depending on the manufacturer. On some machines, the bootloader guides you on the screen what key combination to press, in others the help is hidden and help can be found on YouTube by searching for the machine model number + keyword "BIOS". Access to the menu can usually be seen by opening a rather old-fashioned-looking technical information box full of texts.
The attached video demonstrates how to change the VT-x setting in the BIOS:
The desired virtualization setting is usually in the BIOS setup menu 2 or 3 (from the left, the active menu indicator at the top of the screen). On some machines, the setting may be under the "North Bridge" menu. The selection is marked with, for example, "Virtualization", "Intel Virtualization technology" or "Intel VT-x" or "AMD-V". Select "Enabled" or "On" for the setting.
Finally, go to the rightmost setup menus (usually the 1st or 2nd menu on the right) and look for "Save settings and restart / reboot / reset". Virtualization is now enabled. On some older and affordable PCs, virtualization cannot be turned on because the manufacturer has skimped on cost and failed to license or implement the technology.
If you have already installed VMware or VirtualBox before editing the setting, the installation may have failed and the program will need to be reinstalled.
Audio, webcam, WLAN, Bluetooth or ethernet do not work
In some situations, audio, webcam, WLAN, or ethernet (LAN) are turned off in the BIOS setup.
The sound card is not always activated when imported into FMware Fusion.
The card can be added while the virtual machine is turned off in the machine settings. Press the "Add Device" button, select the sound card. Now the voices should be heard.
WiFi and Bluetooth
in addition to the BIOS settings, the notebook can often be switched off with a separate control button on the side of the machine or with a special key combination (eg Fn-F2 or Fn-F12 - check the machine's manual). This is a normal documented safety feature of the machine.
If you switch from one wireless network on the host machine to another (eg between eduroam and a shared network from your own phone) and the virtual machine disconnects from the network, restart the virtual machine.
All input devices use Bluetooth (Mac)
While this works well with MacOS, the USB version of the virtualization platform currently requires a wired or wireless non-Bluetooth device for initial PIN entry and device pairing. After pairing and entering the code, the Bluetooth devices will operate normally at subsequent startups.
Webcam does not work
First, make sure that the camera is running normally on the host machine without virtualization (for example, test in a browser at http://webcamera.io).
For MacOS Make sure USB 3.0 is turned on in the virtual machine settings and the FaceTime camera is selected.
In a Linux environment, make sure the user belongs to a video group.
Separate USB devices
If nothing else helps, all of the above devices (voice, camera, Bluetooth, WLAN, LAN) can be implemented in an emergency by connecting a USB device with the desired feature to the machine. Also, if a USB version of the virtual platform is used, not all of the computer's built-in components will always have support in the USB version drivers, so you can try to replace the device with a generic USB device.
The following low-cost USB devices have been tested to work:
-
Camera: Logitech and Creative USB 2.0 UVC cameras (eg C920e / C925e / C930e).
The recommended model is one with a built-in microphone! -
Storage: We do not recommend purchasing SD cards, USB sticks, or hard drives from Ebay / Aliexpress stores.
-
Audio: € 5 unmarked Ebay / Aliexpress device
Trade name "PCM2704" (white)
USB manufacturer / model id 24f0: 0142 or
Trade name "External USB Sound Card Channel 5.1 7.1" (blue / black)
USB manufacturer / model id 0d8c: 0102, C-Media C106 -
Bluetooth: 2-5 euro unmarked Ebay / Aliexpress device Trade name "Wifi dongle" (picture reads CSR 4.0) USB manufacturer / model id 0a12: 0001, Cambridge Silicon Radio, Ltd
-
WLAN: 5-15 euro unmarked Ebay / Aliexpress device
Trade name 802.11n WiFi dongle (manufactured by Realtek or Ralink).
802.11ac is not supported! There are numerous models and some just don’t work.
The stick achieves a WLAN speed of 150-300 Mbps. -
LAN: Ebay / Aliexpress device unmarked for 5-10 euros
Trade name "RTL8153" or "Realtek USB3 ethernet"
USB manufacturer / model id 0bda: 8153, Realtek
Stick achieves 900-950 Mbps LAN speed on USB3 port and 300-380
Mbps on the USB2 port. -
Serial module: 1-3 euro unmarked Ebay / Aliexpress device
Trade name CH340G / CP2102 / PL2303 USB 2.0 to TTL UART module serial
converter for embedded system development.
Devices can also be purchased from branded manufacturers, but since these are low-cost devices and generic USB drivers made according to the reference implementation, the branded device may not be any better.
Level 2: operating system and hypervisor
Virtualization is not supported
Virtualization is not supported on the cheapest versions of Windows Home and Starter. There are alternative solutions to this:
- Instead of virtualizing, using a USB distribution of the virtualization platform from a memory stick, eliminating the need for an existing operating system on the machine.
- Purchase and install Windows for power users.
- Replacing a computer (for example, microcomputers)
Virtualization requires a 64-bit installation of Windows and a 64-bit computer with a processor architecture (that is, a PC up to about 10 years old, with the exception of some light laptops). The reason for this is that the virtualization solution is built on Linux and support for 32-bit Linux distributions is being phased out, and there was no desire to build virtualization on a system that will soon run out of support. A 64-bit operating system is also more powerful (by default, SSE2 accelerations, and so on) and more secure (better ASLR, and so on).
Hyper-V
If you have the Hyper-V feature installed, VirtualBox and vmWare may not work properly. Yes, other hypervisors can be installed, but they cannot start virtual machines. The following PowerShell script can be used to check if the feature is enabled (Run as administrator - in the PowerShell window):
if($hyper.Svtate -eq "Enabled") { Write-Host "Hyper-V is enabled!" } else { Write-Host "Hyper-V is NOT enabled." }
If the command says Hyper-V is enabled! the feature should be turned off so that other hypervisors can operate on the machine.
Virtual machine screen resolution
VMware
VMware should automatically adjust the resolution according to the size of the window. If not, check View → Autosize → Autofit guest in the hypervisor menu .
VirtualBox
Note! Guest additions are now pre-installed on the offered virtual machines, but currently may not work properly. The problem is being clarified. The following instructions are for virtual machines that do not have the add-on installed:
VirtualBox Requires the installation of the Guest additions components (run the command install-vbox-guestadditions.sh in the terminal of the virtual machine ).
On non-plant virtual machines, make sure that a virtual Guest Additions disk is added to the virtual machine settings from the virtual machine settings. Prepare for the VirtualBox Guest additions installation by adding an optical drive from the CD-shaped button on the Storage tab of the hypervisor . Select the suggested VirtualBox Guest Additions disc as the drive contents. Navigate to / media / utu / on the terminal . The directory on the Guest Additions disc should appear as a subfolder in the directory. Go there and run the command sudo sh ./VBoxLinuxAdditions.run .
Adding a sound card to a virtual machine
Due to the limitations of the OVA file format, virtual machines have a virtual sound card turned off by default. To add a sound card, turn off the virtual machine (if it is already running), and then:
-
VMware Fusion / Workstation Pro (?): Select "Settings / Sound Cards "and making sure that" Connect Sound Card "is tick.
-
VMware Player: "Edit virtual machine settings" → Hardware → Add → Sound card → Finish and [x] Connect at power on
-
VirtualBox: Settings → Sound → "[x] Enable Audio output "and" [x] Enable Audio Input "
The virtual machine does not start
If the hypervisor shuts down unexpectedly, for example due to a low battery or similar cause, lock files may remain on the disc. As a result, the virtual machine will not start and the hypervisor may give unexpected error messages such as "file permission denied" or similar. The solution is to find the lock files and delete them. VMware stores the files in the same folder where the virtual machine was imported. Usually it is in the path under the Documents folder. VMware Fusion stores the files in a virtual machine package. Find the imported virtual machine and press the second mouse button next to it. Select "Show package contents" from the menu.
Once you find the lock files that you recognize from the .lck extension, delete them. After this, the virtual machine should start.
USB version burning to disc
Disk images from previous versions of the platform were zip-compressed, but new ones were not (the file extension was previously zip, now img). The zip disk image had to be unzipped first, and the file extracted from the package is the actual disk image (though not necessarily the img-terminated name in previous packages).
Level 3: operating software
A general solution to all problems
In most, and especially more complex, virtual machine firmware problems, the simplest solution is to remove the virtual machine and install a new virtual machine.
However, before destroying the virtual machine, make sure that you have not inadvertently saved your work files to the virtual machine. You can use Seadrive mode and GitLab in the cloud of the University of Turku to store files. If you want, you can also transfer files to the host computers using a common shared folder (read the wiki for instructions on VirtualBox). It is still preferable to use cloud storage.
For problems with software used in the course, such as development environments, contact the virtual machine type-specific instructions or the course leader.
GitLab SSH connection issue
University GitLab requires the use of an RSA key for SSH-based git connections. Make sure you have the id_rsa.pub key in the ssh directory, consulting the git / ssh instructions. Do not use an ED25519-type key (it is not supported in Utu's GitLab system) (as of September 15, 2020, the university's GitLab supports ED25519 keys). A key issue can also occur with HTTPS connections with GitLab.